
How to start an online store, for free, with WooCommerce
Having an online presence for your business is essential in the modern retail climate. But how do you get started selling things online? Setting up an online storefront may seem daunting at first, but with the right tools and support, you can have a bustling retail website in no time!
In this post, we’ll show you how to get started selling your goods online through a powerful WordPress plugin called WooCommerce.
For anyone that doesn’t yet have a website on WordPress, or who wants a better understanding on what plugins and themes are, check out our post: Getting Started on WordPress.
For everyone else, let’s get into it—here’s your WordPress ecommerce guide for beginners!
What is WooCommerce?
WooCommerce is a very powerful, easy-to-use ecommerce platform built for WordPress. It’s an all-in-one shop management system that allows you to easily create different products with different price tags, and categories.
It gives you full control as to when products are on sale, and which coupons are available. It will even disable products automatically when they’re out of stock! Best of all, the WooCommerce store setup is simple and the plugin is free to use (however, paid plugins are available to help you extend the functionality of WooCommerce).
How to get your ecommerce business started with WooCommerce
1) Download and install WooCommerce
When setting up WooCommerce from your WordPress Dashboard, navigate to the Plugins tab in the menu to the left of your screen and click, ‘Add New’. Next, search for WooCommerce and click ‘Install Now’ next to the first result.
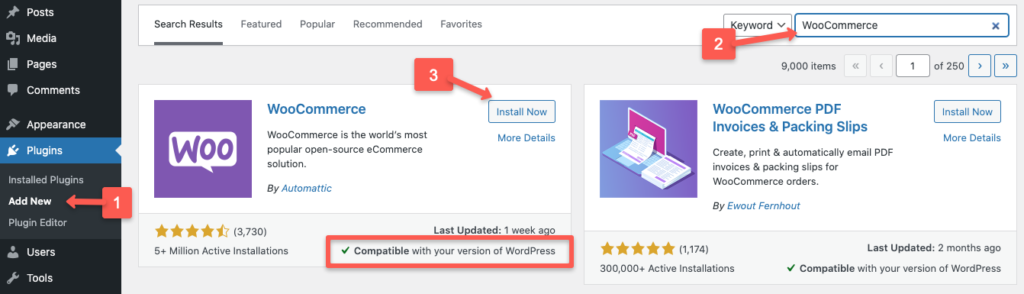
Make sure you see a green checkmark that confirms the plugin is compatible with your version of WordPress, otherwise you’ll have to update WordPress before you proceed.
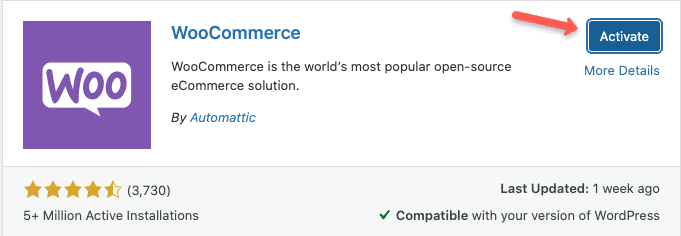
Once installed, click ‘Activate’ to get the plugin started.
2) Set up your WooCommerce store details
Once activated, the setup wizard should begin automatically. If it doesn’t, you can kick it off again by clicking ‘WooCommerce’ in the left navigation menu.

Make your way through the wizard adding details about your business such as your address, industry, etc.
End the wizard by choosing a new theme or confirming your existing one.
3) Add your first product
Based on what selections you chose during the setup wizard, WooCommerce will present you with steps to start selling.
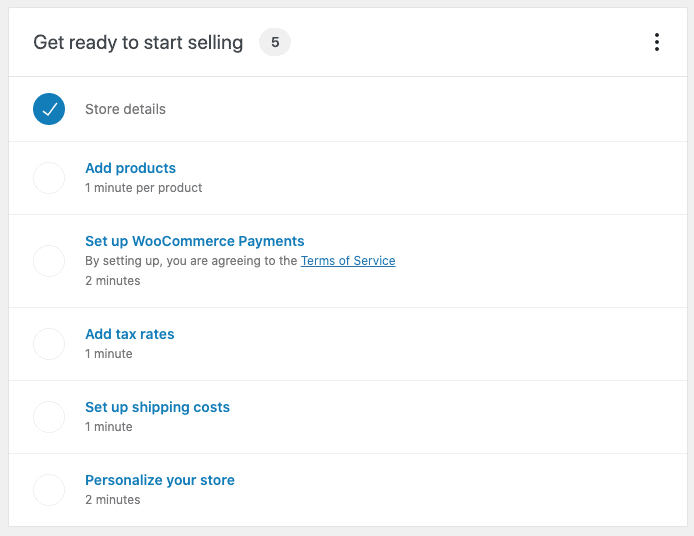
Click ‘Add products’. If this option isn’t present or you’ve navigated away from this screen, you can get back to it by clicking ‘WooCommerce’ from the left navigation menu.
This will load a page with several different ways you can add products, but for this tutorial, we’ll be clicking, ‘Start with a Template’.
Choose your product type from the list.
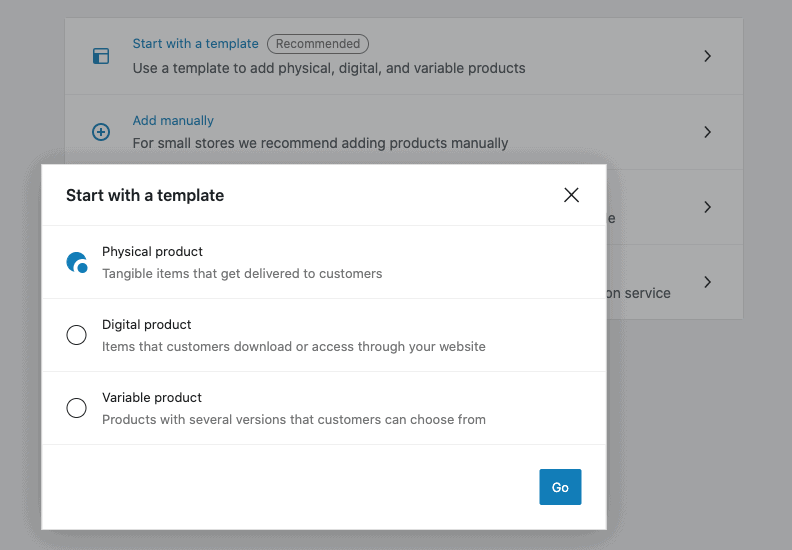
Physical Product: These are tangible products that do not have variations, e.g. a specific television, or an art print.
Digital Product: These are products that exist purely in the digital space for your customers to download, e.g. eBooks and music files.
Variable Product: These are Physical Products that have multiple options available, e.g. a t-shirt that comes in multiple sizes or colors.
For this tutorial we will be clicking Physical Product, but note, the process for the other types is much the same.
You’ll then start filling out your product information, including its name and description.
4) Add product details
Scroll down to the ‘Product Data’ section of the page. By default, the ‘General’ options will be selected and displayed.

General: Here you can set the price as well as a discounted price if desired. You’ll also confirm how your customers see tax in checkout. You can choose whether the entire product is taxable, if customers will only pay tax on its shipping, or if they’ll pay no tax at all.
Inventory: In the ‘Inventory’ tab you’ll create a SKU for your product. Copy this from your existing store’s inventory, or create your own. We highly recommend you check the ‘Manage Stock’ box as that will trigger WooCommerce to label the product as sold out once the specified quantity is sold.
You can also have the plugin notify you by email once stock levels are below the ‘Low Stock Threshold’, as well as specify whether the item is to be limited to one per customer.
Shipping: This one is straightforward. Enter the weight, and dimensions of the product you are shipping. Note, you’ll want the dimensions of the box the item will be shipped in, not the product itself.
Linked Products: Come back to this section when you’ve created more products. Here you can add similar products you would prefer your customers to buy as well as the products you would like them to buy alongside the current product. WooCommerce will then automatically promote these products on your current product’s description page.
Attributes & Variations: If your product comes in any variations, such as size or color, you can enter them in the attributes section. This will amend the product description to include a list of all variations.
However, if you want your customer to have the option to buy the product by the variation, you’ll want to navigate to the ‘Product Data’ Drop Down Menu at the top of the section and select, ‘Variable Product’. A new tab will appear below Attributes called, ‘Variations’.
Back in the ‘Attributes’ tab check the box marked, ‘Used for Attributes’, save the attribute, and make your way to the ‘Variations’ tab. From the drop down menu select, ‘Create variations from all attributes’ and click ‘Go’.
Once the variations are created, click the bolded number next to the attribute to open its product data and start filling it all in!
Categories, Tags & Product Image: Lastly, find your way to the right side of your screen and check the categories that apply for your product. Feel free to add any categories that are missing. Categories are like departments, they help keep your products organized and easier to find for your customers.
You might also want to add tags to further group products within categories which will help your customers search for your products easier. Finally add a great image to represent your product.
Wrapping it up
Once your products are added, head back to the main ‘WooCommerce’ page (from the left navigation menu, click ‘WooCommerce’) and be sure to setup how you will receive payments, your tax rates, as well as shipping cost.
You will also want to click ‘Personalize my store’ and follow the wizard to create a new homepage and design your store. Feel free to make changes to the design, but don’t worry if it doesn’t exactly look how you’d like. You can always revisit your store and make changes to its appearance later.
Finally, be sure to visit the WooCommerce Settings page (from the left navigation menu, under ‘WooCommerce’, click on ‘Settings’) and walk through all of the settings in each of the available tabs.
Conclusion
We hope you’ve found this WordPress ecommerce guide useful! You should now have all the information you need to install and set up WooCommerce on your WordPress site. This should give you a solid foundation to build your online store. The next step is to secure your WordPress site.
Whether you are running a small business or a Fortune 500 company, it is critical to make sure that your online store doesn’t get hacked. You don’t want to have your data stolen and your reputation ruined by an outside source.
Read More about improving your WordPress Security: 5 Easy Ways You Can Improve Your WordPress Security Without Programming Experience
